How we developed the 3D product configurator for Franke Water Systems?
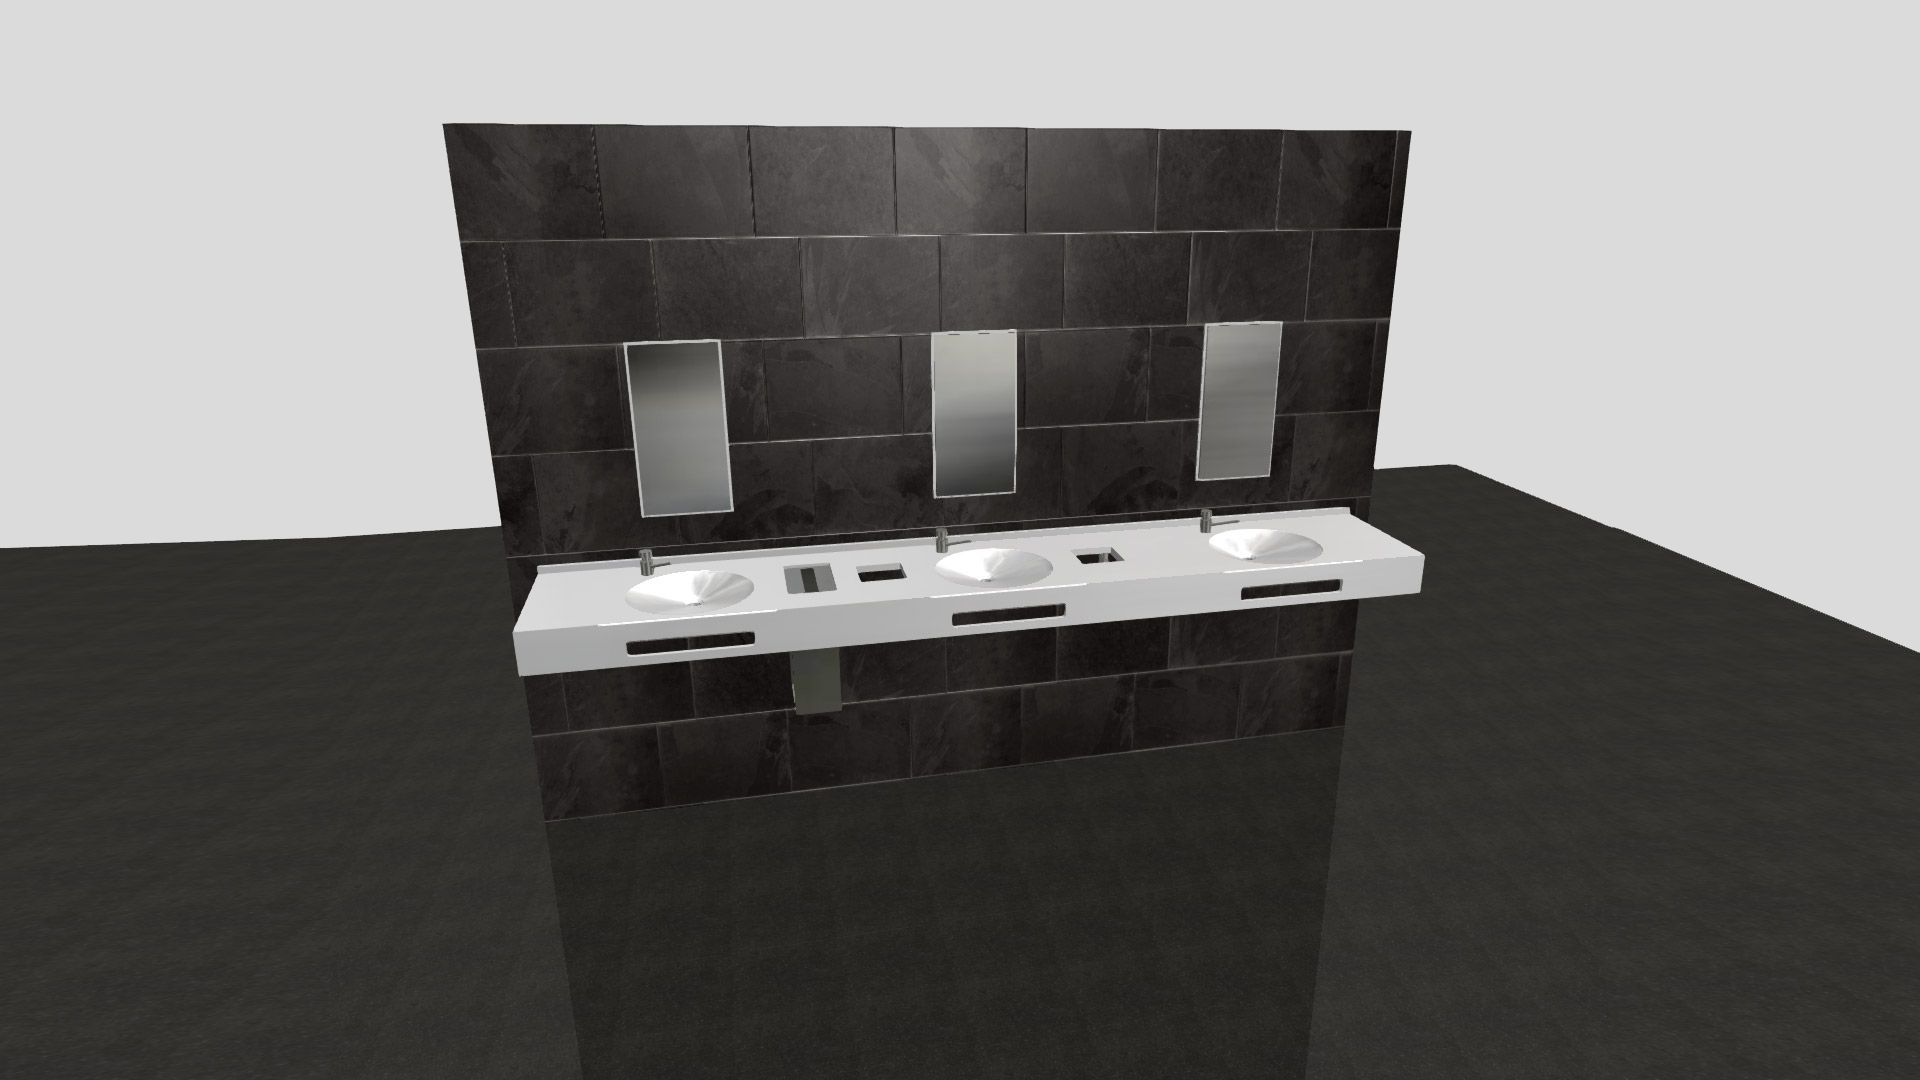

Table of contents
- Initial Requirements
- Project Start
- Technologies
- Development
- The structure of 3D Scene
- The evolution of the Back-End
- What did we learn from the project?
A new project we recently brought online is the 3D Configurator for Franke Water Systems . In this article we want to explain how the project has been developed, which technologies we have used and how we have implemented the 3D configurator.
1. Initial Requirements
For several years Franke has been using an Excel calculation tool based on Visual Basic Code for the creation of personalized washbasins. This will now be replaced by our configurator to simplify the work and to digitize the workflow.
With the help of the new application it is possible to configure washbasins both in a 2D and in a 3D view. This includes the selection of suitable troughs and aprons, the input of desired dimensions of the washbasins with regard to the type of installation, corner design, plate dimensions and positioning of the troughs, as well as recesses and installation parts such as holes for fittings and soap dispensers. In addition, the user can personalize the color of the entire washbasin and coating and adjust various settings regarding mounting accessories and drain accessories.
Finally, after completion of the washbasin, the customer is offered an overview of the total costs and the data is transmitted directly to the SAP system.
Flexibility, design and scalability of the application
One of the requirements of the user interface design was a responsive design, as the product configurator will be used on both tablets and larger touchscreens in the future. In addition, the application should be scalable in order to resolve new expansion problems.
The requirements for version 1 was to provide a room-independent configuration, so the dimensions of the walls adapt to the length of the washbasins. In version 2 it will also be possible to manually enter the room and wall settings. In addition, in version 2, the fittings and Franke Accessoires. will be further configurable. In the future it should not only be possible to configure a washbasin, but also a complete sanitary room.
How does the configurator support the distribution of Franke?
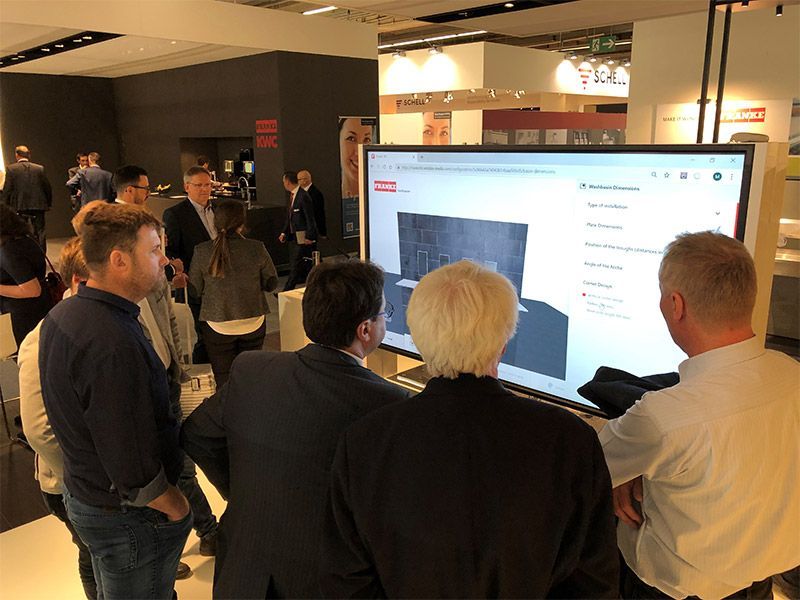
The planners of a new construction project, such as the construction of a shopping center, need washbasins for the new sanitary facilities. In the process, a sales representative from Franke takes his tablet to the customer and configures the required washbasins online with him, directly on-site on his device.
How does it work internally at Franke?
Franke's interior and field service will be trained on the new configurator. Each employee has their own account where they can create their configuration for different projects. He can name the configuration and also define the construction project, i.e. where the project is located, in our case the shopping center. After the sales representative has gone through the configuration with the customer, everything is listed again on an overview page; the customer will also be offered additional products (such as taps, soap dispensers etc. depending on what has been configured) which he can then increase/decrease. The configuration can be saved as a draft so that it can be adjusted afterwards or it can finalized at which point it is no longer editable. Franke then checks the configuration internally (after consultation with the customer) and completes the final step by submitting the order.
2. Project Start
Prototype - Defining the MVP
In a five-day workshop with the Franke Water Systems project team where the idea and the concept of the product configurator was summarized, and the approach and long term goals were discussed. The “Design Thinking” approach was followed.
Design Thinking is a concept for creative problem-solving by professors at Stanford University. The basic idea behind Design Thinking is that interdisciplinary teams in particular can create genuine, outstanding innovations. The Design Thinking Process aims to bring together as many different experiences, opinions and perspectives on a problem.
First of all, it is important to observe, identify and understand the needs of the target group. There are five different phases in Design Thinking which are as follows:
Iterated Empathy: Understanding the problem, the users and their requirements
Define: Re-framing the problem and formulating precise questions under user-centered focus
Ideas: Generating many ideas in brainstorming sessions
Prototype: Development of prototypes / solutions from the most promising approaches
Test: Testing and further development of prototypes or solutions

Wireframing
Based on the results from the Design Thinking process we created the first wireframes for various devices. Usability was a strong focus since the user should be able to operate everything as quickly and easily as possible without having to know what goes on in the background. After the wireframing phase was completed, we were able to develop the UI design in the next step.
UI Design
For the creation of the screen design we used Adobe InDesign and Figma. Since the functionality and rough designs were already completed in the wireframing stage, the main focus was on the design of the various elements in terms of size, color and arrangement.
There was regular communication with Franke for regular feedback as well as our developers, because the designs required their input on points such as functionality and what is possible/feasible.
3. Technologies - Highest Performance with Full Stack JavaScript and Cloud Microservices!
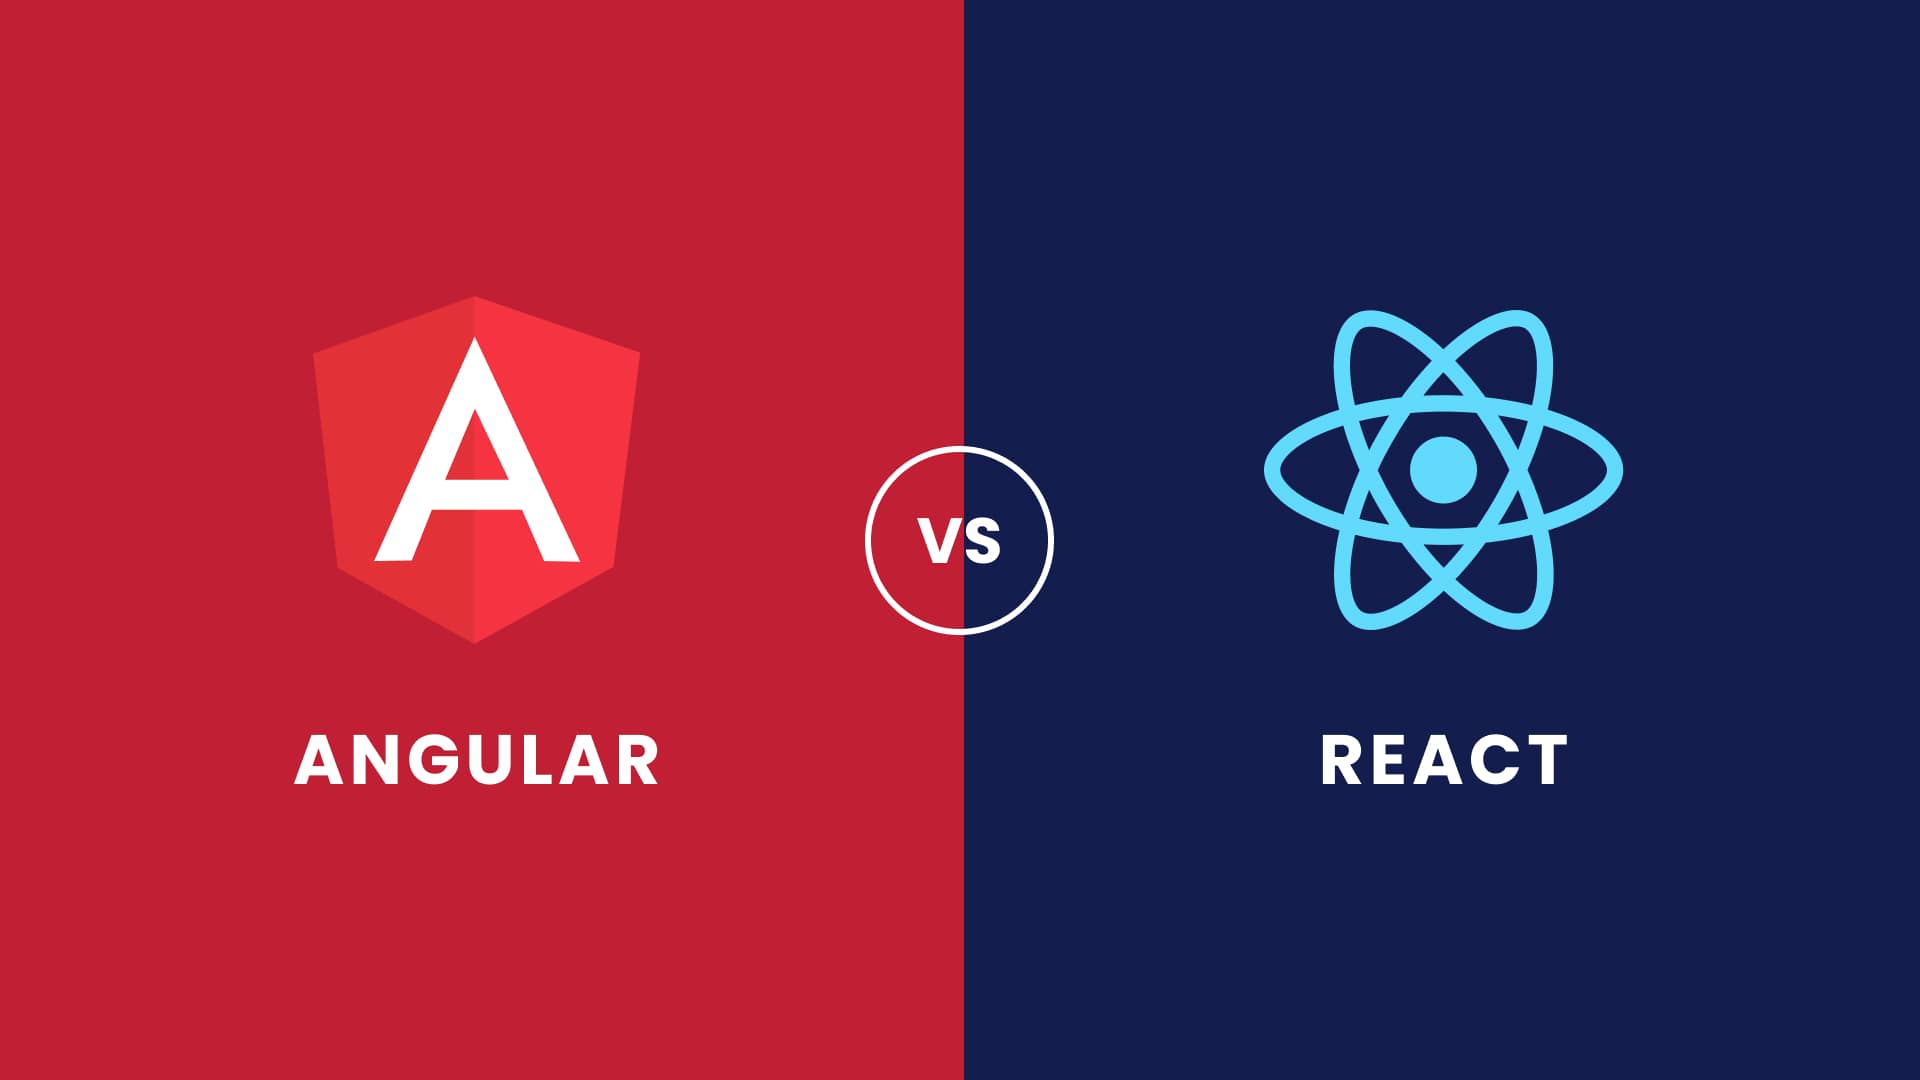
For the development of the frontend we used React and TypeScript, the backend was developed with Node.js and CosmosDB.
React
The frontend of the application was implemented with the Javascript library developed by Facebook React, which is especially engineered for helping to create fast and responsive web applications. It is great for single-page applications and can be used to produce server-side rendering websites, mobile native applications, or Progressive Web Applications. In our case, we developed a Progressive-Web-App (PWA).
TypeScript
TypeScript is an object-oriented programming language developed by Microsoft based on the ECMA-6 standard. It enables the use of language constructs such as classes, interfaces, inheritances, modules and generics with predefined types, based on conventional object-oriented programming languages. TypeScript includes a compiler that compiles the code into JavaScript ready for modern and legacy browsers.
Node.js as development and deployment tool
Node.js is a server-side platform in software development for the operation of network applications. In particular web servers can be realized with it. Node.js runs in the JavaScript runtime environment "V8", originally developed for Google Chrome, and provides a resource-efficient architecture that enables a particularly large number of concurrent network connections.
Microsoft Azure
Azure is a cloud computing platform from Microsoft that, like Amazon's AWS, which provides services such as publishing single page applications, data management, cloud computing, and artificial intelligence. In the case of the 3D Configurator, we used MS Azure to compile the frontend and backend code with continuous deployment on the server, pack it into a Docker container, and then deploy it automatically.
Continuous Deployment
Continuous deployment is an automated publishing method for software that has become increasingly prevalent in recent years and is part of Continuous Integration. Basically, this is about a continuous further development of software and its provision without downtime. The deployment for the 3D configurator is done via a "Linux App Service" from Microsoft Azure. The continuous integration of our applications takes place via Git, with Bitbucket as the host. So when we release a new production-ready version via Bitbucket, we automatically refresh the Git repository on the Linux build server, which calls our self-created pre-configured deployment script and publishes the app after successful compilation. If an error occurs in the process, the new version will not be published. This ensures that code failing to compile will not be sent to users.
Unit-Testing
Unit testing is used to determine the validity of an applications individual functions. For example, if we have a function that is used to add numbers together, when being told to add 2 and 2 together, it should return 4 and if it doesn’t then do not deploy the code. We implemented unit testing for the complex calculations that are carried out when measuring the distances and sizes for washbasin components.
4. The Frontend Development
In order to get a project overview, the page and navigation structure of the webapp was defined first. On the basis of these structures React components were specified, which were optimized for reusability to save development time.
In the first step of the implementation, public pages for the login and registration process were developed as React components. As part of this, the form components required for these processes, such as input / select fields or validation processes, have been developed as reusable components.
In the next step, components were developed both for public pages eg in the registration or login area, as well as pages for the private part of the application (only available after login). To complete the registration process, email templates for various user-management mails were created. To support this, the back-end was extended to help manage and send responses to users (e.g. sending the emails).
The configuration process consists of 7 main categories, with more choices per step, which is why a filter component has been implemented. As soon as the user chooses a selection, the information is passed into the “Plate Builder” which calculates the correct position of the elements (by millimeters). The result (plate builder components) is then passed into the Three.js view which renders the scene, as can be seen below:
private initThreeManager() { if (!this.threeManager) { this.threeManager = new ThreeManager( this.threeManagerData, { width: this.dimensions.width, height: this.dimensions.height }, this.container ); } if (this.container && this.container) { this.threeManager.update(this.threeManagerData); } this.setState({isInitialized: true}); }
private updateThreeManager() { if (this.container && this.threeManagerData) { this.threeManager.update(this.threeManagerData, this.dimensions); } }
private get threeManagerData() { const {configuration, trough} = this.props;
if (configuration && configuration.result && trough && trough.result) { const plateBuilder = new PlateBuilder(configuration.result, trough.result); return plateBuilder.components; } else { return; } }
In addition, different interaction elements were used for the configuration. This customization options can be made via Accordions, Dropdowns, Sliders or Radio and Checkboxes. As can be seen in the following code snippet, all possible options are created in a loop, so that further options can easily be implemented in the future:
public render() { return (
partial_installation_item_${index};
return (
If the user makes an input error, an alert/error message appears indicating that the entry was incorrect. Like the entire configuration process, this is multilingual and controlled by a global state in the application.
public render() { return (
Good performance without sacrificing UX
To ensure an optimal user experience on mobile devices, the configurator has been optimized for various mobile devices & tablet resolutions. One of the key points is that it is easy to use via smartphone using the thumb navigation as a result of the navigation changing for mobile.
The "Plate Builder"
The primary goal of the plate builder is to take all of the user entered data and populate a dataset with the entire washbasin and all its elements (e.g. trough/taps/etc) in their correct positions. This provides us with something that can be reused in multiple places (e.g. to populate 3D/2D scene, and calculating the total price), can be easily extended (since it is specialises in one part of the application), and also be easily unit tested (since we know from the original spreadsheet what each user configuration should result in). The output of this module we like to call “plate builder components”.
5. The structure of 3D Scene
The primary goal of the 3D scene is to take the plate builder components and visualize it in real time. Our Three.js module starts by initialising everything the Three.js library requires to function (e.g. the renderer/effects/camera/etc), adds some initial basic elements (i.e. the floor and lights), and then starts looping through the plate builder components. When it finds a model it loads the model URL, textures it, and places it in the provided position. When it finds a shape, it builds it, textures it, and places it in the provided position. The goal was to keep the Three.js module as simple as possible so that it can be easily maintained with little chance for error.
The 2D Scene
The primary goal of the 2D scene is to take the plate builder components and output a flat SVG element. Our SVG module starts by initializing its SVG HTML tag in the provided context, and then starts drawing based on the plate components it gets passed. Originally this was actually provided by Three.js, which simply used a custom effect to produce a kind of 2D outline, however we switched away from this in order to provide a more performant and responsive solution.
The biggest challenge was the corner radius for the plate. Trying to transform the existing lines in order to produce a curve was not feasible, and in the end we managed to come up with a simple solution of simply overlaying the desired corners as quarter circles/lines.
Three.js
To create the 3D scene we used Three.js which is a popular Javascript library to display 3D scenes in the browser and calculate them on the user's GPU. We used WebGL for this purpose, so that we can do without external plugins. Three.js also offers the advantage that 3D scenes can be created cross-platform, i.e. platform independent. In order to display a scene in the browser, a canvas element is first created on which the Three.js renderer is then initialized. A scene graph can be used to determine what is ultimately displayed in the browser. The scene graph is then given a camera object that defines the angle and distance from which the scene is displayed.
In addition to the camera object, the objects to be drawn, so-called "meshes", are also transferred to the scene graph. Moreover, these objects have further information such as surface information, orientation or spatial coordinates. In our project, for example, washstands are such objects. Light sources for the illumination of the scenes shadows are also transferred to the scene graph.
WebGL
The rendering of Three.js is based on WebGL, which is an API that enables hardware accelerated rendering of 3D graphics in web browsers. The API is based on OpenGL 2.0 and allows 3D content to be rendered in an HTML canvas element.
Blender
All 3D objects were modelled with the software Blender is a free software package which can be used for 3D modelling, texturing and 3D rendering.
6. The evolution of the Back-End
The backend is a RESTful API based on the LoopBack Framework, which already provides some rudimentary endpoints such as authenticating users. It provides CRUD for every model, which is applicable to countless database types.
In the first step of the backend development we started to set up LoopBack and adapt it to the needs of the configurator. With the help of the LoopBack CLI, we have created all previously planned and required remote endpoints and adapted the appropriate data models.
Using the lb model configuration command, LoopBack creates a Json file as a setup, a JavaScript file that expands the endpoints, and assigns them to the Global Express Object. Here is an example of such a model:
Model.json
{
"name": "Model",
"base": "PersistedModel",
"idInjection": true,
"options": {
"validateUpsert": true
},
"properties": {
"name": {
"type": "string",
"required": true
}
},
"validations": [],
"relations": {},
"acls": [],
"methods": {}
}
Model.js
module.export = (Model) => {
// Here you can create logic for the model
};
When this model is added to the global object, the API has a fully configured endpoint, including all common residual API methods, such as GET, POST, PUT, and DELETE. By adding properties, relationships and validations, we can make necessary adjustments for endpoints for the configurator. However, this was only half the battle for our needs. Additional changes were made to provide the desired API, which we will explain in the following sections.
User registration and authentication
For the authentication of the user we use the Access Token method provided by LoopBack v3. Here the user registers with a combination of a username and password. The API checks the login and creates a 256-bit hash from the two values ??together with a magic key and the salts we have configured. This encrypted combination is stored in the authentication database and used to validate all subsequent user requests.
In addition to this registration process, we have incorporated a double-opt-in loopback process to make sure each user provides a valid e-mail when logging in.
However, to have access to protected remote methods, a frontend user needs a valid access token. This is created when the user has logged in.
The data stream and the error messages in the configuration
For validation and storage of the user-made inputs in the frontend, we had to come up with a sophisticated architecture for the data stream. The complexities and possibilities of the interrelationships of the individual troughs in connection with the insert parts on the washbasin, based on the Excel tool specified by the customer, presented us with a difficult task.
Similarly, the results from the calculations had to be stored in a displayable record. The task was therefore to validate the data entered by the user, to save it and to display a valid configuration for the display in the frontend. Non-possible product combinations should cause an error and prevent the API from saving the data, so that no bad configurations occur and only 100% valid configurations are stored in the database. This process happens whenever a value is changed in the frontend and sends a response in no time to the device used by the client.
How does the data stream and the validation of inputs work?
In the following, we will go into more detail about these points.
The frontend presents the data as a 3D scene and gives the user the ability to change data based on the information provided. These are sent to the server using a PUT Remote method.
The backend receives the data and validates each of the sent parameters against generated default values ??and either creates an error based on these values ??or prepares the data for storage in the database. As an example: the user would like to drill a hole next to the sink, we check if there is enough space between the sink, next bowl / sink edge including minimum distances and generate an error depending on the result or prepare all other data to save in the database in front.
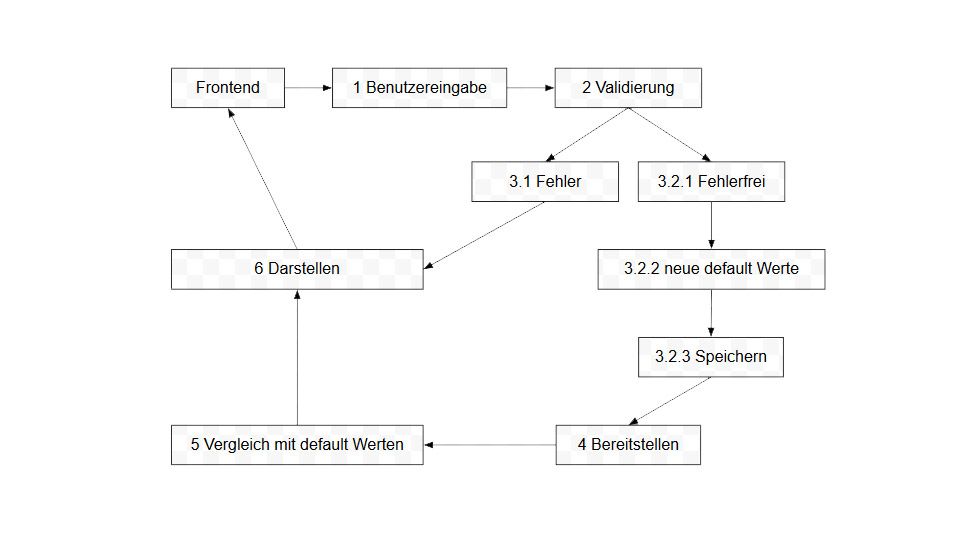
3.1. If the configuration created contains an error, we stop validating the rest of the configuration at this point and send an error to the frontend.
3.2. The created configuration is valid after the first check and the backend can continue its work:
3.2.1. The configuration corresponds to our required dependencies and is error-free. We can return the valid data and prepare the values ??for saving the data.
3.2.2. Based on the changed and valid data, new possible combinations for the configurator arise. To be able to display these in the frontend, the backend generates dynamic default values ??(default values). We add these to the configuration.
3.2.3. To get a compliant dataset, we need to recheck and prepare the changed values ??for the database. If everything fits, the data is stored in the database.
The backend sends the data back to the client in response.
The frontend checks the data, compares it to the default values ??and, if necessary, prepares warnings for the interface.
Here the circle of the data flow closes, depending on whether the backend sends an error or the saving of the configuration was successful:
a) The API returns an error as a result. The user is informed where he needs to improve.
b) Everything is valid and the new data is displayed in the interface, the user can continue with the configuration.
7. What did we learn from the project?
Overall the project has demanded a lot: No existing valid product data, no clear error concept in the frontend, and other dynamic factors such as different product prices for EU countries; are just a few examples. This is why taking an agile approach from the beginning was the right choice for this project.
Final delivery timelines for the project:
Conception and UX validation in 4 weeks
Finished screen designs for desktop and mobile in 4 weeks.
Pure development time for the beta in just 4 months with over 30 different 3D models implemented
Was JavaScript the right choice?
The selection of technologies was the right one. We managed to develop the application on a pure JavaScript code basis, both the frontend and the backend. Most of the configurators found in our research were equipped with a PHP backend. Our developers with a specialised skill-set in JavaScript allowed them to work on both parts of the application easily and the performance of the application has turned out well.
Microsoft Azure and Microservices - not to be underestimated!
Unlike our other projects, most of which run on AWS or other servers, one of the customer's requirements was to deploy to a Microsoft Azure server and use the Microservices architecture.
Microservices are a popular architectural blueprint for building robust, highly scalable, independently deployable applications that can evolve rapidly. However, a successful microservices architecture requires a different approach to designing and building applications.
The result exceeded expectations
Franke and the Ventzke Media team are very proud of the result which we have created in close cooperation with them. We are pleased to be able to follow the tool in daily use, where it will support Franke's complete field and field service as of next year.